

I had a really busy fall this yr, and now I can’t imagine it’s been three months since my final weblog, “Bringing Some Supply of Fact to Your NetAI Agentic Playground.” That’s far longer than I had deliberate once I made my “public accountability assertion” about my subsequent weblog publish being concerning the work I had accomplished to deliver NetBox into my CML simulations in a straightforward and seamless style.
However at the moment, I’m again. And desperate to reveal two new contributions to the Cisco Modeling Labs (CML) group to your quick use:
- A CML node and picture definition for a NetBox server
- CML2NetBoxa Python utility that auto-populates NetBox based mostly on a CML lab
Let’s dive into every of those choices and see how they work!
NetBox server node for Cisco Modeling Labs
Not each CML community I construct wants a NetBox server, however each time I’m engaged on a brand new community automation mission, or one thing that entails creating a reproduction (or shut duplicate) of our manufacturing community—a “digital cousin,” so to talk—I’ll need to have a supply of reality populated with knowledge from the community simulation.
Up to now, I’ve manually populated NetBox with knowledge utilizing APIs, scripts, or CSV imports. Nevertheless, these choices aren’t nice, and so they weren’t a part of the lab itself. That’s the place this new node definition is available in.
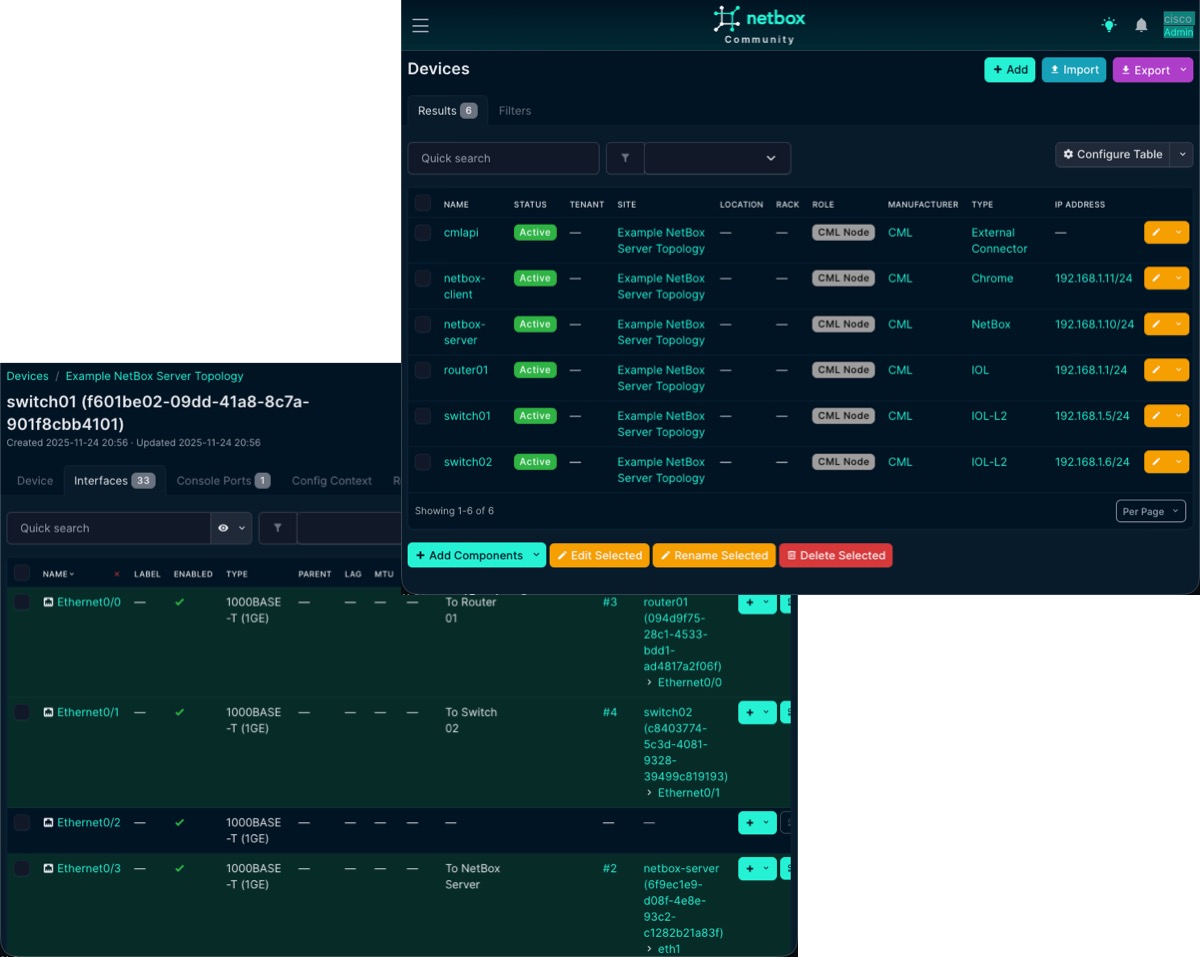
Now I can merely drag the “NetBox” node into the topology and configure it to auto-populate from the CML lab definition itself.
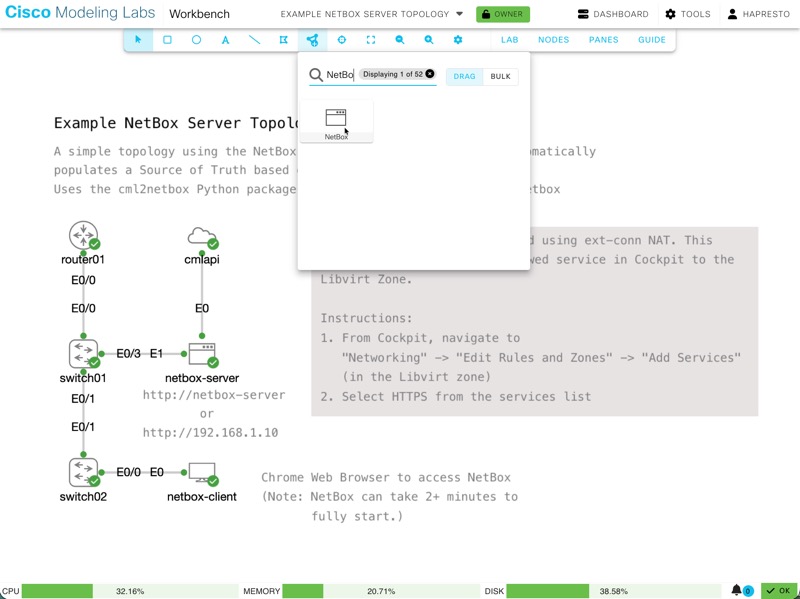
After that, simply begin the lab, and the node will learn the CML lab data and routinely create websites, units, IP addresses, and even cables connecting interfaces throughout all nodes within the topology.
Fairly neat, proper? For these of you curious about some technical particulars, let’s dive in somewhat deeper.
First up, the node definition, or extra precisely, the picture definition that has been constructed and shared, is predicated on the Alpine 3.21 picture included on the CML 2.9 reference platform. The NetBox-Docker mission was then used to deploy NetBox Neighborhood v4.4.5.
This NetBox server is meant to run inside CML as a part of lab topologies, and I wished it to be very straightforward to make use of in these labs. So I made some “opinionated” decisions in its configuration.
To align with different default credentials for nodes inside CML, the admin consumer for NetBox has been pre-created with a username and password of cisco.
I additionally created an API token “0123456789012345678901234567890123456789” for this consumer. (You’re welcome to vary these default credentials after you begin the node, however having an admin account and API entry accessible at node startup helps you to get began along with your community automation work instantly with no need to arrange NetBox your self.)
As well as, I’ve pre-populated a Producer referred to as “CML” together with System Varieties for every of the CML node varieties within the reference platform, in addition to a number of extra node definitions from the cml-community and my private use. Having them pre-created hurries up including units to NetBox. Nevertheless, when you have a node definition that’s NOT included within the base picture, don’t fear. The code that populates NetBox will dynamically create new System Varieties as wanted.
Whereas I labored to make utilizing the NetBox node as straightforward as potential, there are necessities for including it to a lab so it may possibly entry the CML lab particulars to populate NetBox. I’ve offered full particulars within the CML Neighborhood README for the node, and I encourage you to learn them once you arrange the brand new node by yourself CML server. I’ll cowl the highlights right here as effectively.
For starters, the NetBox node will want connectivity to the CML server’s REST API by way of an “exterior connector” node. It may be both a bridge or a NAT-based exterior connector; nevertheless, for a NAT-based connector, you must replace a firewall rule within the CML Cockpit interface first. Full particulars on the change required and why are documented within the README.
Subsequent, you’ll must replace the default CONFIG for the node with particulars to your CML server and the lab you need to synchronize with. The default day 0 config supplied with the node consists of detailed feedback I left to assist customers perceive the choices and the right way to use the node. You’ll discover non-obligatory blocks for customizing the server’s community configuration, however to routinely populate NetBox from CML, you’ll must uncomment and supply particulars for a set of setting variables.
# export VIRL2_URL=https://192.168.255.1
# export VIRL2_USER=admin
# export VIRL2_PASS=1234QWer
# export VIRL2_VERIFY_SSL=False
# export LAB_NAME="My CML Lab"
These values are wanted as a result of, whereas the NetBox server runs on the CML server, there isn’t any means for the node to routinely “know” these particulars concerning the server. So we offer them as ENVs so the scripts that hook up with CML know the tackle, credentials, and which lab on the CML server to synchronize with. I anticipate that you simply’ll synchronize the identical lab that the NetBox node is working on, however you don’t need to. You could possibly synchronize any lab from the CML server.
Talking of scripts, you’ll see references to 2 scripts on the finish of the configuration. These scripts first guarantee NetBox is up and working, then hook up with and sync from CML. The output from each of those scripts is saved on the node in two log information that you could overview after the node finishes booting. Simply hook up with the NetBox server’s console and overview the contents of the information.
((.venv) ) netbox-server:~$ cat startup_log.txt

Checking if NetBox (http://localhost) is responding...
Web site not responding, ready 5 seconds... (try 1/48)
.
Web site not responding, ready 5 seconds... (try 14/48)
Web site is responding! (try 15)

Checking if CML Controller (https://192.168.255.1) is reachable...
Web site is responding! (try 1)

Writing VIRL2 setting variables to /residence/cisco/.profile...
Trying to sync topology to NetBox...
🔄 Beginning lab topology synchronization...
📡 CML Server: https://192.168.255.1
🗄️  NetBox Server: http://localhost
🧪 Lab Identify: Instance NetBox Server Topology

Starting lab synchronization now.
Including 6 nodes from CML lab 'Instance NetBox Server Topology' to NetBox
📊 Processed 5/6 units...
Including cables for six nodes from CML lab 'Instance NetBox Server Topology' to NetBox
📊 Processed cables for five/6 units...

Topology synced efficiently.
While you’re on the console, you possibly can re-run the sync like this.
((.venv) ) netbox-server:~$ cml2netbox sync lab

🔄 Beginning lab topology synchronization...
📡 CML Server: https://192.168.255.1
🗄️ NetBox Server: http://localhost
🧪 Lab Identify: Instance NetBox Server Topology
Starting lab synchronization now.
Including 7 nodes from CML lab 'Instance NetBox Server Topology' to NetBox
📊 Processed 5/7 units...
Including cables for 7 nodes from CML lab 'Instance NetBox Server Topology' to NetBox
📊 Processed cables for five/7 units...
You would possibly marvel why you’d need to re-run the sync? For those who add extra nodes to the CML topology after it begins, or add hyperlinks between units, these adjustments might be routinely added to NetBox. For those who’ve deleted nodes or cables, the script received’t clear these out; you’ll must delete them manually.
And you may additionally marvel what cml2netbox is? Effectively, that’s the underlying “magic” that makes this node work. And it’s the topic we’re going to speak about subsequent!
CML2NetBox: A Python utility for EVERYONE!
I notice that a few of you may want your CML lab knowledge in NetBox, however not in a NetBox occasion working within the CML lab; quite, in a NetBox server you have already got working. If that sounds such as you, then don’t fret, simply pip set up cml2netbox and have enjoyable!
The reality is that the NetBox server node makes use of cml2netbox underneath the hood; it’s packaged immediately into the node/picture definition and routinely configured and run throughout node initialization. However now let’s take a look at how we are able to use the utility immediately.
Just like the node configuration, you’ll want to supply values for the CML server you’ll be synchronizing from, and additionally, you will must configure the main points for the NetBox server you’ll be synchronizing to. An instance .env file is supplied with the code on GitHub.
# CML2NetBox Configuration Instance
# Copy this file to .env and fill in your values

# CML Lab Particulars
LAB_NAME="Your CML Lab"
LAB_ID="your-lab-id-uuid-if-needed"

# CML Server Configuration
# May use VIRL2_* variants for backward compatibility
CML2_URL=https://your-cml-server.instance.com
CML2_USER=your-username
CML2_PASS=your-password
CML2_VERIFY_SSL=True

# NetBox Server Configuration
NETBOX_URL=https://your-netbox-server.instance.com
NETBOX_API_TOKEN=your-api-token-here
NETBOX_VERIFY_SSL=True
Simply copy this file and supply the info to your personal servers.
For completeness’ sake, you may also present all this knowledge as command-line choices when working cml2netboxhowever I discover setting them in a file is less complicated than typing them each time I run the command.
Let’s see what choices exist for the device.
cml2netbox sync --help
Utilization: cml2netbox sync (OPTIONS) COMMAND (ARGS)...

  Synchronization instructions for CML and NetBox integration.

Choices:
  --help  Present this message and exit.

Instructions:
  device-types  Sync CML machine varieties with NetBox machine varieties.
  lab           Sync CML lab topology with NetBox.
There are two choices. Good.
You possibly can “put together” a NetBox server by creating the CML producer and machine varieties for all node definitions with cml2netbox sync device-types. Nevertheless, this isn’t required. For those who run cml2netbox sync lab earlier than syncing the machine varieties, the device will create machine varieties for every node within the lab. It will take somewhat longer the primary time, as new device-types are created. Nevertheless it does imply solely the required machine varieties might be created.
However the actual enjoyable comes once you sync a lab like this.
cml2netbox sync lab

🔄 Beginning lab topology synchronization...
📡 CML Server: https://100.75.36.232
🗄️  NetBox Server: http://100.75.36.232:6999
🧪 Lab Identify: CCNA Prep 2025 S3E3 Superior ACL Exploration
Starting lab synchronization now.
Including 8 nodes from CML lab 'CCNA Prep 2025 S3E3 Superior ACL Exploration' to NetBox
📊 Processed 5/8 units...
Including cables for 8 nodes from CML lab 'CCNA Prep 2025 S3E3 Superior ACL Exploration' to NetBox
On this instance, I synchronized a 2nd CML lab from the topology above into the NetBox server to reveal what occurs once you sync a number of CML labs into the identical NetBox server and the way they’re differentiated.

CML2NetBox will create a brand new NetBox Web site for every CML lab synchronized. Which means that you should utilize a single NetBox server to carry knowledge from 1, 10, and even 100 CML topologies!
And one final be aware… cml2netbox will create a .log file for every run of the device. By default, the logging degree is INFO, however should you run in “verbose” mode, you’ll get DEBUG degree logging within the file. This may be useful if/when one thing goes fallacious in a sync job, so you possibly can determine what occurred. In my testing, this most frequently occurs when you’ve gotten a number of labs on a single NetBox server and encounter duplicate or conflicting objects.
cml2netbox -v sync lab

tail -n 10 ./20251202-140246-cml2netbox.log


2025-12-02 14:03:13 - httpcore.http11 - DEBUG - response_closed.began
2025-12-02 14:03:13 - httpcore.http11 - DEBUG - response_closed.full
2025-12-02 14:03:13 - urllib3.connectionpool - DEBUG - http://100.75.36.232:6999 "GET /api/dcim/units/?title=server-sw&site_id=2&restrict=0 HTTP/1.1" 200 1924
2025-12-02 14:03:13 - urllib3.connectionpool - DEBUG - http://100.75.36.232:6999 "GET /api/dcim/interfaces/?device_id=14&title=port0&restrict=0 HTTP/1.1" 200 2333
2025-12-02 14:03:13 - cml2netbox_pkg.netbox_helpers - INFO - Interface port0 already has a cable: 11
2025-12-02 14:03:13 - cml2netbox_pkg.netbox_helpers - INFO - No cables created for node server-sw
2025-12-02 14:03:13 - cml2netbox_pkg.netbox_helpers - INFO - Connecting cables for CML node setup-installation
2025-12-02 14:03:13 - cml2netbox_pkg.netbox_helpers - DEBUG - Skipping hyperlink the place present node shouldn't be interface_a
2025-12-02 14:03:13 - cml2netbox_pkg.netbox_helpers - INFO - No cables created for node setup-installation
2025-12-02 14:03:13 - cml2netbox_pkg.cli - INFO - Accomplished synchronization of 8 nodes to NetBox
And accomplished!
Let it not be stated that Hank doesn’t preserve his guarantees… it simply would possibly take me 3 months to get to it 😉
Anyway, I hope you loved this weblog publish, and much more so, that you simply reap the benefits of one or each of the choices I shared.
In case you are new to CML, please take a look at Introduction to Community Simulations with Cisco Modeling Labs | CMLLAB Studying Path in Cisco U. You can too get began with Cisco Modeling Labs – Free Version fast and simple.
Till subsequent time!
Join Cisco U. | Be part of theCisco Studying Community at the moment free of charge.
Be taught with Cisco
X | Threads | Fb | LinkedIn | Instagram | YouTube
Use #CiscoU and#CiscoCert to affix the dialog.
Converse Your Lab into Existence with AI-Pushed Cisco Modeling Labs and MCP
Utilizing CI/CD Pipelines for Infrastructure Configuration and Administration